Wednesday 23 September 2015

UNIT 1, 2 & 4 Mono-printing

After the completion of my second glossary page and towards the end of the day we tidied up to begin a new activity: Mono-printing. We watched Claire's demonstration in which she used a brayer to roll ink onto a plastic wallet that was taped securely to the table, she then placed a paper on top of the ink and without resting her hand on the paper she drew a hand on the back of the paper. After she drew the hand she lifted off the paper to reveal the ink print on the paper of the hand. This is known as indirect printing, you could also you the imprint in the ink on table to produce a direct print by placing a piece of paper on the ink and use a clean brayer on the back of the paper.

In preparation for making my own mono prints I used the China Collé technique I had learnt from print making, I used purple tissue paper to reconstruct a hand on the page. I then proceeded to use this to produce an indirect print with black ink. The China Collé technique was more effective when mono printing rather than Lino printing. The result was quite smudged however I still though it turned out rather successful.

I then decided on producing a direct mono print to show evidence that I understood how to produce both types of mono prints, personally I preferred the indirect method as I thought you could produce some interesting peices when using a combination of techniques. 

UNIT 1, 2 & 4 Water Vs. Fire

After some inspiration from pinterest I came up with an idea for my second glossary page to illustrate colour. I decided to focus on the temperature of colours and started to think about ways to incorporate ice vs fire scenario onto the page. I found this image on the Internet and used it as a starting point.

I decided to change the hand position ever so slightly and drew a basic outline of my own hand onto the page. In the image the hands and are punching each other therefore I drew the hands in a comic book/anime style to represent the action within the drawing. Now to add the water and fire, I looked at some photoshopped images to help me capture the movement, shape and colour of the elements. As this was a colour page I used inks for the water and fire to keep the vibrancy of the colours intact.

I continued to illustrate each of the hands until both were complete, I chose to use darker skin colours on the fire hand as I thought they were warmer tones and more pale skin colours on the water hand in keeping with the cold colours of the water. 

To finish off the page I used black ink on the back ground the colours would stand out further and left spaces which left behind the title and brief descriptions on the page. 


UNIT 1, 2 & 4 Print-making Workshop

Last Thursday I experienced my first workshop, Print-making, in which we looked at zentangles and henna designs to inspire us create our own designs. After drawing up several miniature designs we choose our favourite and discussed why. My favourite design was of repetitive feathers that are illustrated with patterns because I wanted to create a tribal design and personally I believe feathers represent that culture and feathers also work well with modern adaptations.

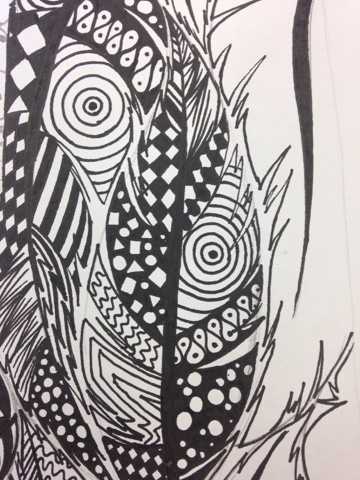
Jess then began to explain the process of Lino printing to the group as we would produce prints of our designs using this process. Lino printing is a type of relief printing in which you carve your design into a block of Lino then apply ink using a brayer (rubber paint roller) and put it through a printing press with a sheet of paper. After processing the explanation we began sketching our designs onto blocks of Lino. As our current project is revolved around hands I adapted my design so that it appeared to be a henna design on the back of a hand. Unfortunately you can only just see the sketch of my design on the Lino but here is a picture:

Now we began to carve away using the Lino cutters. At first I kept being too heavy handed resulting in me cutting out large pieces of Lino however eventually I began to get the hang of it using different sized Lino cutters to carve out the intricate details of the feathers. 

We then proceeded to rolling on the ink and printing our designs onto paper. It took a while to apply the right amount of paint that was needed, as you can see the first try was quite pale.
I then began experimenting with colour and paper to achieve different affects. I preferred using warm colours on the brown paper as I believe it helped me achieve the tribal affect I had originally wanted.

Jess then explained how to 'La poupée' which is a French term for using different coloured inks when print-making. To continue with my tribal theme I used red and black for this technique and I thought the results were really successful! 

The finish the day we wer taught another technique, China Collé, which is another French term meaning we would glue coloured tissue to the paper before printing onto it. I used some purple tissue paper in the shape of a hand and then used red and yellow to print onto the paper. It didn't work as well as I had hoped because I put Abit too much ink on to the Lino so the design is smudged and the tissue paper is hidden. I hope I will find the time to practise China Collé as I'd love to produce some work using this technique.

Monday 21 September 2015

UNIT 3 The Role of an Art Critic

Art criticism can take many forms and writing styles: Scholars interpreting artworks for journals, Journalists reviewing an art gallery exhibition for the weekly addition of the newspaper or simply artists responding to each others artworks. However the role itself isn't as simple as it seems, after all anyone can voice their ideas on the latest art movement but it takes an art critic to write up their interpretations confidently and honestly in order to record the ever changing art world for others to read. Art critics have a reputation of being overly harsh due the negative connotations of "criticism" however in my opinion their clever and skilful input allows us, as readers, to look at a piece of artwork and discover the underlying intentions of the artist and consider different perspectives.

Wednesday 16 September 2015

UNIT 1, 2 & 4 Wire Sculptures

To finish the day one of the 3D design tutors came by to help us construct our own wire sculptures of hands. He showed us many of his own examples that were beautiful abstract styled sculptures which many people decided to attempt however I chose a different approach as I know that abstract work is one of my weaknesses. I began by moulding the wire around the outline of my hand to make sure it would be in proportion then adding coiled wire to the fingers to show both the creases in the fingers and the 3D shape. After completeing the coils of the thumb and fingers I was unsure of how to continue as I was happy with how it was however we only had a small amount of time left so I decided to leave it how it was. Overall I really enjoyed the experience and found shaping the wire quite easy, I would definatly complete more wire sculptures in the future 

UNIT 1, 2 & 4 The Illustrated Glossary

As part our projects we will be creating illustrated glossaries which will provide evidence of our understanding of the terminology used in art and design. Whilst being taught how to stretch paper our tutor, Claire, explained to us the elements of design: Line, Shape, Form, Colour, Texture, Space and Value. The elements of design would provide us with the first seven pages of our glossaries. Personally, I found it difficult to think of a creative way to show the definition of any of the elements of design. Eventually, I decided on drawing a line drawing of my thumbs fingerprint using different types of lines to visually explain the definition of 'Line'.
Unfortunately, due to my lack of ideas, my late start prevented me from completing a second page therefore I am giving myself a target to improve my time management in order to complete tasks on time and to benefit my future career within art and design.

UNIT 1, 2 & 4 'Hands On' project

Last Thursday, we were informed of our first project: "Hands On". During this project we will be introduced to visual language, Research skills, Materials, Processes and technical skills in art and design in order to have a better understanding. Throughout the day we completed a few basic drawings of our own hands in different styles to evaluate our individual drawing style and the others we were shown. At first I struggled with this excersize as I failed to draw my hand in proportion but after a bit of trial and error I began to get the hang of it, now the concept of drawing a hand isn't as daunting as I know I can do it eventually. As for the styles of drawing I really enjoyed the cross hatching, contour line and my own drawings; I believe this is due to the fact it is more controlled and takes more time. However, when asked to complete a continuous line drawing within two minutes was very difficult as I couldn't go back and correct it I just had to continue which I found quite annoying.
The next task was more time consuming as we were asked to draw our own hand on some black paper using coloured pencils, I decided on a more realistic style of drawing and began the outline. Due to the first task I found the outline more easier even though I had to redo some parts. I was really worried to start colouring as I wasn't sure how good the quality of my work would be but I was really proud of my efforts by the end of the day.


Wednesday 9 September 2015

The importance of "play" and creativity

Throughout the induction with dominoes I was continuously recording the day through photographs whilst also taking more creative photographs of our work. whilst reviewing my photography I began reflecting on what the induction had taught me. Introducing "play" into our work, I realised, is quite important as our imaginations and creativity blossomed as a child playing games and running wild therefore by playing around with the dominoes we unleashed our inner child replenishing our slightly dusty imaginations allowing our creativity to develop and evolve. Creativity is the key to any artists work, a collaboration of original ideas and inventiveness, without it artwork would be a repetitive and meaningless. I used my creativity to find other purposes for objects around the room and incorporate them to create unusual and original domino runs, I was very happy with the results and that inspired my photography, by trying different angles I produced some images that I was really proud of. 


Induction with dominoes

Today as part of our induction to art and design an artist, James, came in to help us understand how "play" is an important aspect when creating art work. He brought masses of wooden dominoes for us to work with whilst completing tasks throughout the day. We split into smaller groups to work as a team to build a huge circular structure within the beginning of the day, without much discussion we each began working on individual segments therefore efficiently producing a tall sculpture within a small amount of time.
In the afternoon we worked on creating a huge functional domino project which would cover the entire room, after discussing the path the dominoes would take around the room we split up completing  sections individually so that the final project would include all of our ideas.

As a group we suffered many knockbacks after accidentally knocking down parts of the track and struggling to get some of our ideas to work however we kept trying and working together in order to find a solution. Unfortunately, in the end our project didn't work as well as we'd like to although we were all happy with the result of our teamwork and creativity. If we were ever to have another attempt at being 100% successful with our domino project we would test each section and double check each other's work perhaps we would have achieved a more successful outcome.