
Within my photography work I began to explore the direction of the layers although I found that horizontal layers were probably going to be the most effective I wanted to make maquettes to make sure. However, if I drew up the shapes for each layer free hand they would most likely be very inaccurate therefore I came up with the idea to make a mould of a head within the ceramics workshop to help create accurate shapes for each of the layers. There were a few steps involved and there are a few times I had to follow
health and safety requirements.
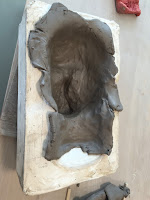 Step 1
. First I prepared some clay, rolling it out and then covered the expanse of the mould of the head with the clay. Making sure to push the clay down to fit around the shape of the mould and to smooth together the edges of the clay to create one smooth mould.
 Step 2. I then used a heat gun to partially dry out the clay so that I could remove it from the mould and still be able to cut it. I had to be careful when using the heat gun to aim it at the clay and the clay only
 Step 3.
Then I carefully removed the clay from the mould and began cutting the head into slices using a craft knife. I had to do this very gently to ensure the clay didn't cave in and change shape;
also I had to be careful to not cut myself with the sharp blade.
 Step 4.
 I then carefully laid out the cross sections in order so that I wouldn't get them mixed up when it came to making a maquette with them.
 Step 5.
 I repeated the process but cutting the head into vertical cross sections so that I could make maquettes demonstrating both directions and make a final decision.
 Within my photography work I began to explore the direction of the layers although I found that horizontal layers were probably going to be the most effective I wanted to make maquettes to make sure. However, if I drew up the shapes for each layer free hand they would most likely be very inaccurate therefore I came up with the idea to make a mould of a head within the ceramics workshop to help create accurate shapes for each of the layers. There were a few steps involved and there are a few times I had to follow health and safety requirements.
 Step 1. First I prepared some clay, rolling it out and then covered the expanse of the mould of the head with the clay. Making sure to push the clay down to fit around the shape of the mould and to smooth together the edges of the clay to create one smooth mould.
 Step 2. I then used a heat gun to partially dry out the clay so that I could remove it from the mould and still be able to cut it. I had to be careful when using the heat gun to aim it at the clay and the clay only
 Step 3.Then I carefully removed the clay from the mould and began cutting the head into slices using a craft knife. I had to do this very gently to ensure the clay didn't cave in and change shape; also I had to be careful to not cut myself with the sharp blade.
 Step 4. I then carefully laid out the cross sections in order so that I wouldn't get them mixed up when it came to making a maquette with them.
  Step 5. I repeated the process but cutting the head into vertical cross sections so that I could make maquettes demonstrating both directions and make a final decision.
No comments:
Post a Comment